You are currently browsing the archives for the Foods category.
Blogroll
 Facebook
 Goodreads
 LinkedIn
 Meera Lester
 Twitter
SITE VISIT COUNTER


Archive for the 'Foods' Category
Edible Flowers Add Flavor and A Flourish
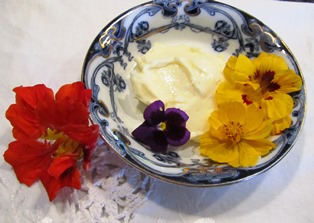
Edible flowers make ordinary butter beautiful
Picture a red nasturtium or peppery-tasting marigold displayed around a mound of lemony-yellow butter. Or, imagine the beauty of a handful of sugared purple violets or red rose petals, sans the sour petal base, crowning an iced picnic cake.
During bygone eras when the Romans ruled the world or Queen Victoria reigned during the age named for her, flowers weren’t just for bouquets on the table, they formed an integral part of the food that was consumed.
Many flowers and seeds are poisonous, so it is imperative that you correctly identify any flower or plant you plan to eat or use on food. Also, make sure you are not allergic to the plant before integrating its blooms into your diet.

What flowers are growing in your garden that you could use in your culinary endeavors?
Several edible florals include the blossoms of herbs such as lavender, dill, garlic chive, coriander, basil, bee balm, marjoram, oregano, anise hyssop, winter savory, summer savory, sage, and mint. Also edible are the flowers of certain varieties of pumpkins, squash, cauliflower, scarlet runner bean, radish, sweet garden pea, and fennel.
Consider also the delicate blooms of society garlic, dianthus, pansy, signet marigold, red clover, African marigold, plum, scented geranium (rose, lemon). You can candy the blossoms of apple and crabapple, but the seeds are poisonous.

Lemon and orange tree blossoms are fragrant, lovely, and tasty
Some blooms, such as hibiscus (China rose), mint, rose, and chamomile are used to flavor teas. Lemon blossoms will have a slightly bitter taste whereas orange blossoms are sweet but both are lovely floating in crystal bowls of punch.
Research your chosen plant and correctly identify it before using it in any food preparation. See, http://www.extension.iastate.edu/publications/rg302.pdf
Also see, http://www.ext.colostate.edu/pubs/garden/07237.html
Bartlett Pears Are Ready to Pick Now
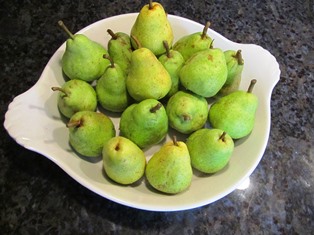
Pick summer Bartlett pears while still firm and ripen in a bag for peak flavor
Bartlett pears are ready to pick in July and August. The fruit should be picked from two to seven days before you plan to use it. Choose pears on the tree that are fragrant and green. There shouldn’t be any soft spots or mushiness.
Pluck the pears and put them in a paper bag in your kitchen. Add a banana or apple as the ethylene gas will help the pears ripen. You’ll want to poke some holes in the bag and fold over the top. Check the pears often to see how they are ripening.
Pears will reach their peak and be perfect for eating or using in cooking for about two days. When the top of the pear (where the stem is located) yields slightly when pressed, you’ll know the pear is at its peak. Don’t wait until the fruit feels soft all over, it’s past its peak and will be mushy.
Bartlett pears taste terrific grilled, made into pear butter, or baked into pie. They also taste great when eaten raw. But these pears are not the type you can pick off the tree and eat. They really need to ripen first and, as I’ve already pointed out, the best way to do that is in your kitchen.
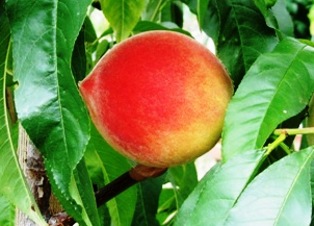
Fresh Peaches Make Yummy Upside Down Cake
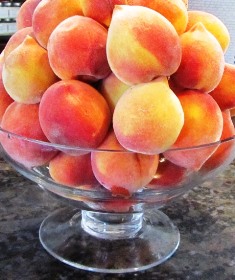
Fresh Elberta peaches are firm and juicy, perfect for summer dessert
When our Desert Gold peach trees produced a few peaches at the end of May, we picked and ate all of them.
Now it’s the middle of July, and the Elberta peaches have ripened. Many have fallen from the tree. Over the last week, I picked most of those yellow-fleshed, honey sweet fruits and made peach preserves. With the remaining peaches hanging on the tree and about to drop, I am going to make a peach upside down cake.
The recipe looks long, but it is easy to follow and the cake is reminiscent of the upside down cake my grandmother used to make on her farm, located between Columbia and Booneville, in central Missouri. She always served it with homemade ice cream, made from fresh (cow’s milk) cream. For a quick substitute, you can use a quality vanilla ice cream to complement the taste of the warm peach cake.
Peach Upside Down Cake
Ingredients:
Three to four large peaches, peeled, stone removed, and sliced to produce 2 cups of fruit
½ cup light brown sugar, packed
1 teaspoon cinnamon
3 Tablespoons butter
1 ¾ cup all-purpose white flour
¼ teaspoon of salt
2 teaspoons baking powder
½ teaspoon cinnamon
½ cup butter (room temperature)
¾ cup granulated sugar
2 large eggs
½ teaspoon vanilla extract
¼ teaspoon almond extract
2/3 cup milk
Directions:
Preheat oven 325 degrees Fahrenheit
Grease a 9-inch square cake pan with butter.
Wash, peel, and remove pits of peaches; cut peaches into thin slices.
Combine brown sugar, 1 teaspoon of cinnamon, and 3 Tablespoons melted butter.
Add the peaches and toss to coat.
Arrange the peach mixture in the prepared baking pan.
Directions for making the cake batter:
Combine the flour, salt, baking powder, and ½ teaspoon cinnamon in a bowl.
Cream butter and sugar in a separate bowl and add eggs, vanilla extract, and almond flavoring.
Beat until well mixed.
Add the flour mixture to the creamed butter and sugar mixture, alternating with the milk, beating after each addition to blend.
Assembling:
Spoon the cake batter over the peach slices taking care to spread evenly until peaches are all covered.
Bake for 55 to 65 minutes. A toothpick inserted in the center of the cake should come out clean.
Remove from oven and invert onto a cake plate. Allow 5 minutes for the cake to pull away from the pan and drop onto the plate. Then gently remove the cake pan. Scrape any peach slices stuck in the pan onto top of cake.
Serves six.
Apricot Linzer Cookies
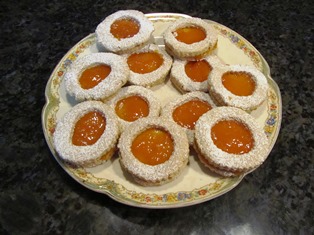
Fill these cookies with strawberry, raspberry, fig, or apricot jam or dulce de leche
I’m a self-professed cookie monster. I can’t imagine watching PBS’s MASTERPIECE MYSTERY! without a cup of my favorite Earl Grey tea and a cookie. Okay, maybe two cookies And my favorite is actually a two-layer, jam-filled cookie. These cookies are known as Linzer sablés and are the cookie version of the famous Austrian Linzertorte, dubbed the world’s oldest known cake (torte is Austrian for cake, Linzer is forLinz, a city in Austria).
The top cookie and bottom are made of the same nut-flour dough; it’s just that bottom cookie is solid, whereas the top has a hole in the center (to reveal the jam filling). The dusting of powdered sugar on top gives the cookie a lovely professional look.
They are easy to make and are pretty enough for a tea party. Choose different shapes of cookie cutters for the ring cutout. Some specialty shops carry Linzer cookie cutter sets. Use a heart shape cutter to make Linzer cookies for a wedding reception, anniversary party, or Valentine’s Day; a pumpkin or witch’s hat shape for Halloween; or, stars for the Fourth of July and also Christmas. The jewel jam color doesn’t just hold the cookie together; it emphasizes the cutout shape.
Ingredients:
9 Tablespoons unsalted butter (equivalent of 1/2 cup, plus 1 Tablespoon)
1/2 cup granulated sugar
2 egg yolks
1/4 teaspoon vanilla extract
3/4 cup almond flour
3/4 hazelnut flour
2 1/4 cups pastry flour
apricot jam for filling
powdered sugar to sift on top
Directions:
Set oven to 350 degrees Fahrenheit, but wait to do it until after you’ve made the dough and chilled it for one hour.
Combine butter and sugar in a mixing bowl and cream until light and fluffy.
Add one egg at a time and beat into the mixture.
Add vanilla (alternatively, bitter almond).
Add to the mixture the almond flour, hazelnut flour, and pastry flour and combine.
Cover and refrigerate for a minimum of one hour.
Roll the dough out on a lightly floured surface to 1/8 inch thickness.
Cut circles out of the dough using a three-inch round cookie cutter.
From half of the circles, take a one-inch round cookie cookie cutter and cut out a center hole, forming a ring.
Place rings and circles on an ungreased baking sheet.
Bake in the center of the oven for 7 to 10 minutes. They should appear golden brown.
Remove and allow the cookies to cool.
Assembly:
Spoon a dollop of jam on each solid circle and spread it evenly over the top.
Place a ring on top of each jam-coated circle.
Lightly dust the tops of each ring.
Makes approximately 4 dozen cookies
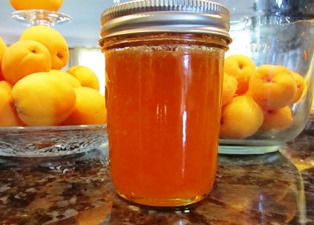
Sun Drying Apricots
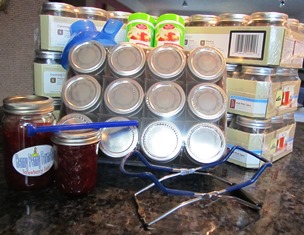
Canning equipment and a couple of jars of strawberry jam I recently made
My husband supports my obsession for making jam and otherwise preserving summer’s bounty. Two weeks ago he brought home five cases of organic apricots and cherries from the farmers market and cases of canning jars. Yesterday he brought me seven more cases of canning jars with rings and lids.
The fruit on the apricot trees here on the farmette is ripening now. So are the yellow and small red plums. The figs and apples will come later but the trees are already heavily laden. I have canned dozens of jars of jam. I think I will dry some apricots.
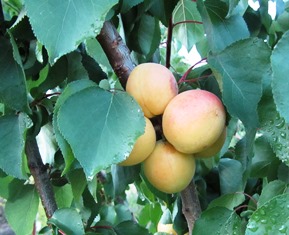
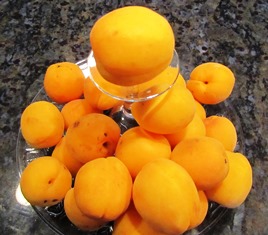
Ripe apricots are ready for picking and canning or drying
Sun drying apricots requires 2 to 4 days of hot sun (preferably above 98 degrees) for the fruit to lose its moisture and turn leathery. Luckily, our local weather forecast is temperatures at the end of next week to hover in the mid- to upper 90 degrees Fahrenheit. High temps and low humidity are key to successful sun drying of fruit.
The acid of lemon juice helps preserve the color of fruit before drying
Here’s the process I use.
Step 1. Gather together the equipment such as a drying table; trays to hold the fruit; and cheese cloth or a screen to protect from insects, flying leaves, dust, birds, and the like.
Step 2. Wash the fruit, cut into two pieces, and remove the pits.
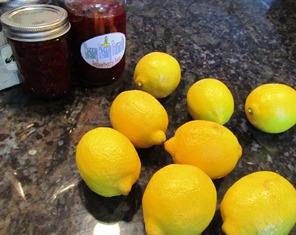
Step 3. Dip fruit into crystalline ascorbic acid–1 teaspoon to 1 cup of water to prevent fruit browning. Or, dip fruit for 3-5 minutes in lemon, lime, or orange juice. But after two batches are dipped, replace with fresh juice. Drain well after dipping.
Caveat: Sulfuring of apricots and other dried fruits produces an excellent product, but is to be avoided if you suffer from asthma because it can trigger an asthma attack. I stay away from sulfured products precisely because of this reason.
Step 3. Place fruit in a single layer. Similar size pieces of apricot will dry in approximately the same length of time.
Step 4. Cover trays with cheesecloth or a screen. Test for perfectly dried fruit–no moisture present when an edge is cut. The fruit will be pliable.
Simple Strawberry Ice Cream
Homemade ice cream using fresh strawberries is the perfect summer treat
With fruit so abundant this time of year, the opportunities for making homemade treats are seemingly endless. I like to pick a quart or more of strawberries when they’ve ripened to make ice cream. Strawberry ice cream is a perfect treat for a Father’s Day picnic or barbecue.
This STRAWBERRY ICE CREAM recipe is simple to follow and only requires a few ingredients and a little time.
Ingredients:
1 to 2 quarts ripe strawberries
2 cups sugar
3 pints cream
pinch of salt
2 Tablespoons vanilla
Directions:
Pick, wash, and hull the strawberries.
Pass them through a course sieive, mashing and pressing the berries through the holes into a bowl.
Mix with 1 cup of sugar and set aside for one hour.
Scald the cream in a double boiler.
Add 1 cup sugar and pinch of salt to the cream to make the custard.
Remove from heat, and let cool.
Stir vanilla into the cream custard.
Fold the strawberry mixture into the custard and freeze.
Farming Prerequisite: Muscles

Preserving luscious stone fruit can involve hours of work, even when the process of canning is simple
Preserving the bounty of the orchard, garden, and hive is necessarily labor-intensive. The kitchen work is especially hard on the shoulders, back, and legs during stone fruit season because it requires hours of standing, washing, cutting, pitting, stirring, wiping, boiling, bottling, and labeling.
Apricot jam is easy to make but the fruit must be washed, pitted, and quartered first
Still, I love seeing my pantry shelves stocked with jars of jam, marmalade, conserve, and honey. At last count, I’ve made (so far this season) 70 jars of apricot jam and 12 of cherry-orange conserve.
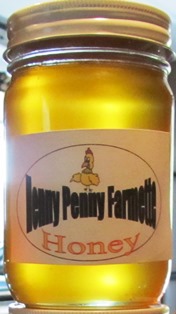
Spring honey for our family has been drained from a frame, strained, and bottled
Harvesting honey from a hive is not exactly easy work either. My beekeeper neighbor and I removed a few frames of honey for ourselves in late May. From that work, this much I know: lifting a honey-filled super isn’t exactly for the faint of heart.
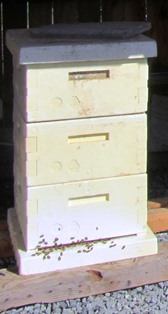
Supers full of honey are heavy to lift and carry
When the hive has a second or third super on top, lifting (not moving, just lifting) the whole shebang requires a lot of upper body strength.

Weed pulling is another job that requires muscles. This morning I weeded for a couple of hours before I’d had enough. Some weeds can grow tenacious roots up to a foot long and the roots can also have many branches. While I use a spade or shovel often as an aid to weeding, there’s something satisfying about leaning over and pulling out a weed. It’s a compulsion I share with many gardeners.
I didn’t know when I was in my twenties and off on a pilgrimage to India that the yoga I learned there and have done ever since would pay big dividends in the farm work I do today. Joint flexibility and strong muscles are absolutely necessary for the labor-intensive work of farming.
Jam, Jelly, Conserve, & Fruit Butter
Apricots tossed with lemon juice preserves the lovely color
I admit to having a weakness for palate-pleasing soft spreads made from fresh fruit. My taste for fruit spreads started in my childhood with my grandmother, who introduced me to the process of picking and preserving the fresh seasonal fruits we found on the farm–mulberries, damson plum, blackberries, gooseberries, and peaches.
My grandmother would load the breakfast table with hearty farm-to-table foods and hot, freshly made biscuits that we slathered with butter. I could always count on at least a couple of bowls of jams or jellies. For us farmers, breakfast and lunch were the most important meals of the day, providing us with energy for the hours of toil that followed those meals.
Later, as an avid traveler, I fondly remember breakfasts in the United Kingdom and throughout Europe, especially France, where my petit déjeuner included strong coffee, juice, and bread (usually some type of roll such as brioche or croissant), butter, and an exquisite soft spread of jam, jelly, fruit butter, or conserve. You might wonder, what’s the difference?
Jam: made from fruit, sugar, and pectin (to thicken) that are boiled to achieve a spreadable consistency
Jelly: made from juice (from various ingredients or fruit that has been crushed and strained), sugar, pectin, and acid, gently boiled to render clear color and firm shape
Conserve: fruit and nut spreads that are chunky; they make a nice condiment for certain meat dishes and cheeses, like a goat cheese with fig-walnut conserve
Preserves: fruit in jelly
Fruit Butter: made from fruit that has been slow cooked until creamy and color is opaque or translucent
Ripe cherries will be made into preserves or mixed with oranges for a marmalade
As I write this, I have four cases of organic ripe apricots and cherries on my kitchen counter from the farmer’s market. So, like my grandmother, I’m going to eat my breakfast and then work for the next several hours preserving these delicious seasonal fruits into spreads for future breakfasts.
Jam to Die For
Apricots show up at local farmer’s markets in late May in Northern California
My husband brought home three cases of apricots from the farmer’s market over the weekend so I have to make jam whether I’m ready or not. Since I wanted to finish the murder mystery I am writing, I pushed the jam making off my to-do list for a couple of days because making jam, like writing a book, requires my full attention.
But I figured out a way to do both. Yesterday I wrote a whopping 20 pages (some in the morning, the rest at night) and made eight jars of jam (in the afternoon).
Today, I hope to write an equal number of pages (since the end of the book is within striking distance) but I also want to make two dozen jars of apricot jam. Both types of work are labor intensive.
The exquisite color of my first batch of apricot jam is preserved due to lemon juice
Thank goodness that crafting a mystery doesn’t mess my office like jam making messes the kitchen–in fact, the room begins to resemble the aftermath of a cyclone. The cleanup can take hours. But the jam is so worth the effort. I can only hope that my mystery turns out as good as my jam.
Mother’s Day Means Preparing for Stone Fruit Season

Apricots are still not ripe, but the color change signals they will be soon
Mother’s Day marks for me the beginning of stone fruit season. The peaches, apricots, plums, and cherries will begin to ripen within a week or two. In my grandmother and mother’s kitchens in rural Missouri, the preparations for making jam began as soon as the fruit’s color changed.
Perfectly ripe peachs can be made into luscious jam
I begin my search for jars, lids, rings, spoons, funnels, labels, and other canning supplies as soon as I notice that fruit color shift. I like to have everything washed, cleaned, sterilized, and organized before the fruit is ready.
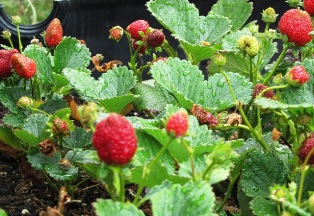
Luscious strawberries, big, red, and ripe means it’s time for strawberry jam
This is the time, too, to organize the kitchen and storage areas. All those jars of jam will have to be stored somewhere. Right now the cottage doesn’t have much room–a little space is available beneath the cabinets off the kitchen in the bar area.
I’m thinking metal shelving could go into another area, a separate room that currently houses the water heater and furnace (turned off most of the year) since the climate is so mild.
Finally, I’ll be searching new versions of recipes for jam that go beyond the basics. I’ve added rum, spices, and vanilla bean to previous peach jams. This year, I’m interested in trying a recipe that involves the addition of smoky chipotle chilies to the jam. I’d also like to try to make a chunky blueberry-peach jam.
For my jams, I use organic fruit grown here on the farmette or purchased at my local farmers market from certified organic farms and suppliers. Using organic fruit means you can feel confident that the jam that you eat, feed your family, and give to friends is wholesome and safe to consume. What Mother’s Day breakfast tray would be complete without a luscious fruit jam?