You are currently browsing the Henny Penny Farmette weblog archives for June, 2014.
Blogroll
 Facebook
 Goodreads
 LinkedIn
 Meera Lester
 Twitter
SITE VISIT COUNTER


Archive for June, 2014
Puzzling through a Cozy, Weeping at a Memoir, and Forgetting the Peach Pie
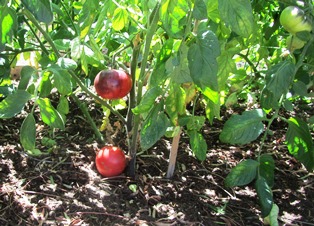
The heirloom blue tomato vines have to be staked, especially since we grow them in raised beds
I couldn’t breathe in yesterday’s heat. But with so much work to be done around the farmette, I soldiered on, staking heirloom blue tomatoes. I hadn’t finished canning my organic apricots and now the plums and peaches were ready. I felt overwhelmed and longing for cool spot to sip tea, rest, and read.
We had already removed the apricots from our “torture tree” since we’ve been unable to surmount its many problems after planting it five years ago. Carlos wasted little time chain-sawing it down. I deadheaded the roses, while he dug out the stump.

The bees have to work really hard on hot days to keep the queen and brood cool
Then with a clear view to our hives, we quickly realized that the we needed to suit up and install extenders or the bees would swarm. Even as we felt the urgency, we realized there were also dozens of other chores screaming for our attention.
I told myself that breezes would soon blow inland from the Carquinez Strait, a channel of the San Francisco Bay where the San Joaquin and the Sacramento Rivers flow to the ocean, but by mid-afternoon, nary a leaf moved on the apricot, plum, and pomegranate trees. By four o’clock when the wind finally did kick in–the air wasn’t cool as it usually was. The winds blew strong and stifling hot and threatened to suffocate anyone still working outside.
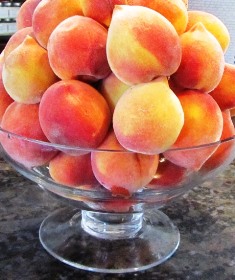
Freshly picked Elberta peaches are easily turned into a scrumptious pie or cobbler
Abandoning the outside chores, I retreated indoors and turned on the air conditioner. Seeing the lug of apricots and crock of peaches resting on the kitchen counter, I groaned. The jam had to be made, but I couldn’t face stirring boiling fruit on a hot stove.
Deciding to use up some of the fruit for a simple after-dinner dessert, I flipped through the pages of a few cookbooks. Maybe a cobbler would do or a peach pie. I really didn’t need a recipe for those, but in Country Cooking by Dori Sanders, I found an intriguing raisin-cinnamon crust that sounded tasty. I bet it would go with peaches but I probably could have baked it on the patio floor.
With a glass of sweet tea and an armload of paperbacks and hardcovers, I curled up on the couch and finished reading Murder is Binding, Lorna Barrett’s debut book in her cozy Booktown Mystery series. I love this author and her writing, but soon figured out who done it. Still, I read to the end; you never know when a clever twist might show up.
Next, I read the last few pages of A Tuscan Childhood by Kinta Beevor. At bedtime, I’d been savoring the chapters of that book like pieces of rich, dark chocolate. Beevor’s evocative descriptions of her bohemian childhood in Tuscany captured my imagination, drawing me in so completely I could almost smell the wild thyme, pine needles, and rocky Tuscan terrain in the searing, summer heat. Like Frances Mayes (Under the Tuscan Sun), who wrote a quote for the cover, I felt sad when Beevor’s lovely memoir ended.
Returning to the stack, I selected another memoir, The Orchard, by Theresa Weir. I’d bought the book on impulse during a trip to the farmers’ market at Todos Santos Plaza, our downtown green space surrounded by bars and banks and, of course, a second-hand bookstore. Drastically marked down, the book had been summarily deposited on a set of moveable shelves, and rolled outside the storefront for a quick sale.
The artist and writer in me understood immediately why I had picked it up and purchased it: the cover art pictured a young couple in a loving embrace, standing in lush green grass surrounded by apple trees. But there was something in that image that evoked sadness, like a bittersweet dream of a time past, viewed through a long lens.
As the descendant of five generations of farmers, I suspected Weir’s book would resonate with my own experiences of farm life in America’s heartland with bone-chilling winters of snow and ice and sweltering summers when you prayed for rain. What I didn’t expect was exquisite writing and the juxtaposition of love against the deadly realities of widespread pesticide use on the farms that ushered me into her story and swept me along. I finished that book in one sitting and will long be haunted by it.
I felt guilty for having only paid pennies for Weir’s book. A pittance for a tale that evolved out of all she had lived through. Less than the price of bus fare to journey with her as she pieced together scenes from her life in the Heartland. In every page, I was with her as she struggled, never abandoning her dreams. She learned as I had how to tuck them away while you dealt with the realities of a hard life with heart-breaking lows and highs that reached euphoria. But there were scenes she left out, only hinting at experiences she said she would “never talk about.” The truth is, I wept after putting down her book.
When a reader identifies so closely with a character in a story (and this was Weir’s personal narrative of her life), he or she rides the emotional ups and downs with that character. Good writers understand how to tug at their readers’ emotions and milk the drama. Theresa Weir had skillfully threaded a leitmotif of darkness and light, joy and sorrow, pain and healing through her story, but never once did I feel manipulated. Every sentence of The Orchard rang true.
I couldn’t read anymore after putting that book down. As I made dinner, I thought of how many scenes in her life resonated with mine. Even the widespread pesticide use on farms and the stubbornness of farmers to change.
I thought about Rachel Carson’s famous book, Silent Spring, that sounded the wake-up call to farmers everywhere about the dangers of chemicals in fertilizers, pesticides, and herbicides. So many small farms have been overtaken by agribusinesses these days and still the chemicals are used. I decided to forgo making the peach pie.
With the heat of the day gone, I opened the windows and stretched out between freshly washed sheets. I listened to the rustle of oak and eucalyptus leaves. To crickets and the unseen critters that make noises in the night. I listened to the soft voices of my Lebanese neighbors chatting in their orchard with relatives.
As dreams beckoned, I could almost smell the fresh lilacs that Theresa Weir had written about in her memoir. Their cloying scent had filled her grandmother’s kitchen just as they had filled my grandmother’s, my mother’s, and mine. I wondered if the lilacs would ever disappear or if the world would one day wake up to find the honeybees gone, the fruit trees without fruit, and the berries and other sweet produce in our gardens and orchards reduced to a memory.
One Curious Chicken and a Five-Gallon Pot
Rhody, the friendliest, most communicative chicken I’ve ever owned is the smallest in my flock of little hens. Barely 16 weeks old and not yet laying eggs, she would be a teenager in human years, I suppose. And like a teenager, she is curious and appears to thrive on new experiences.
Yesterday, the Rhode Island Red’s curiosity got her into a hot spot, literally.
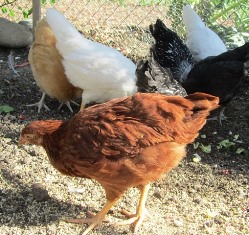
Rhody with the rest of the flock of nine chickens
The blood orange sun had nearly disappeared over the farmette’s western fence when I noticed a chicken missing from the flock. I was sitting outside trying to feel cool for it had been a searing hot day. As dusk set in, I noticed the chickens moving toward the hen house.
It didn’t take long to figure out that Rhody wasn’t among them. Panic set in as I recalled a couple of hawks circling the farmette earlier. I ran inside and woke my husband from his nap and the two of us set out on a search.
We covered all of our property and then ventured into the neighbor’s acre. We found no chicken feathers that might indicate a tussle with a hawk and my spirits should have been buoyed by that . . . but I imagined other terrible scenarios.
Fighting back tears, I followed my husband back through the gate to our farmette. Not about to give up the search, I retraced my steps to the garden. On the way, I kicked over an upside down black container that had held a five-gallon fruit tree.
And there stood Rhody. She remained frozen like she was as stunned to see me as I was to find her. She must have been under that container during the hottest hours of the day without water or food. She seemed weak, but not as bad off as I would have expected being trapped in 90-plus degree heat.
She managed to wobble back to the hen house on her own two legs. Eschewing the perch, she crouched down for the night in a straw-lined nesting box.
This morning, curious Rhody was the first out of the chicken house. As she made a beeline for the garden, I found myself remembering that old adage about how curiosity can kill a cat. In Rhody’s case, it almost cooked a chicken!
Building A Honeybee House
For my birthday this year, my husband surprised me with some practical beekeeping gifts and a promise to build an attractive bee house to hold our hives. In a plastic, five-gallon honey bucket, he’d placed a beekeeper’s suit, goatskin gloves, and a smoker.

A honey bucket with a spigot makes it easy to drain honey into jars
This weekend, he made good on his promise. Although the temps hit 85 on Saturday and Sunday, he suited up in a lightweight beekeeper’s topper with protective netting over the face and got to work measuring, cutting, and securing the waterproofing material, hammering it in place.
With the waterproofing material attached to the roof and sides, he then covered the structure with old fence boards. But it wasn’t easy to mark the cut lines wearing gloves much less cutting the boards with the arm and table saws. He peeled the gloves off.

Beekeeper access is through the rear; the upper story holds a supply shelf; bee entrances are at the front bottom
Now, I know one thing about honeybees. Knocking at their door (say, with a hammer) will bring the guards out and they’ll sting . . . which they did.
My husband was on a mission and wasn’t about to let a bee sting stop him. He rubbed the spot with an ice cube, refused to take any Benadry®, and returned to work. But, not before donning some gloves.
But the gloves he put on weren’t beekeeping gloves. They were gardening gloves, good for deadheading roses but not much of a defense against venom-filled stingers.
So, for a little additional insurance against any more bee stings, we lit the smoker to calm the bees a bit. My husband was nearly finished working around the entrance to the hive when one of the honeybees apparently took notice of the fabric portion of the glove and stung right through it.
Even then, Carlos didn’t want to stop working. Only two metal roof sections remained to be cut, placed, and secured along with a shelf for the supplies. But it was sunset. The bees were going in for the night, and we were working in their flight path. We decided to call it a day, too.
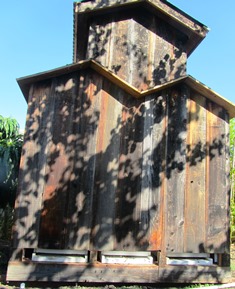
Bees need about six feet of unimpeded space straight in front of their hive entrance
The bee house roof will need to be finished before the rainy season starts in November. The good news is that the bees won’t bother Carlos if he stays in back of their house or on the roof. Activity at their front door sends an alarm through the entire colony that a predator is trying to get in. The honeybee defense is to go into attack mode, even if the “predator” in this case is the architect who designed and built their darling little house.
Ten Ways Cool Down on a Hot Day (and Safeguard Your Health)
On this second day of summer, the thermometer is telling me what I already know. It’s dang hot! I’m thinking hot enough for a sunstroke as I watch the apricots fall from the tree, the honeybees cling to the exterior walls of their hives, and the chickens pant so hard their tail feathers are moving in and out.
I can’t do anything about the high pressure ridge causing temps to soar over Northern California, but I do have some tips for keeping cool and avoiding sunstroke and sunburn. Plus, the tips will work anywhere it’s hot.
1. Avoid going outside from 11:00 a.m. to 3:00 p.m. (the hottest part of the day) to do chores. Instead, tackle chores during early morning hours (and even then, put on your sunscreen).
2. Freeze a bottle of water and as it melts, refresh yourself with frequent sips; in fact, always drink lots of water on hot days.
3. When the sun is at its zenith, tie a wet bandana around your head and another around your neck. Repeat as often as needed.
4. Make a pitcher of sun tea and drink it out of tall glasses with cool slices of lemon and sprigs of mint.
5. Move a comfy chair into a quiet, cool area of your garden and read a favorite book.
6. Sit near a fountain where you can listen to water falling. While you are enjoying the peace, engage your hands in quiet work like breaking beans, embroidering a tea towel, or labeling packets of seed.
7. Turn on the ceiling fan and take a restorative nap. Farming and gardening involve hard labor. Chores will wait–one of the reasons farmers eat lunch midday and lie down, doing their work in early morning and late afternoon.
8. Take a cool, refreshing spa bath with scented bath oil or soap. Wash your hair. You’ll feel ever so cool and clean.
9. Drench your T-shirt with cool water before putting it on. Then, lie on a mat and do some deep breathing to quiet your heart, lower your blood pressure, and slow your metabolism. Ideally, you might enjoy doing some stretches in deep shade, especially near water.
10. Suck on frozen juice popsicles or ice cubes.
Summer may bring hot days, but don’t let the heat take its toll on your health. With a little imagination, anyone can find creative ways to beat the heat until the sun goes down, thereby avoiding potential risks for sunstroke, sunburn, and heat exhaustion.
Fixing Jam that Won’t Jell
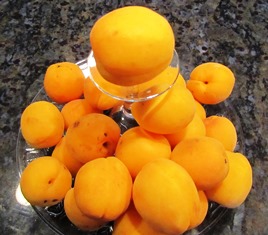
Apricots from the local farmer’s markets arrive in late May in N. California
It happens in jam-making. You do everything right and the jam has a lovely color, flavor, and texture but remains runny long after the jars have cooled following the boiling water process. What to do?
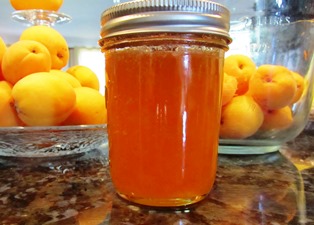
Apricot jam tastes great on almost any type of toast
Reprocess the jam in small batches (a quart at a time). A quart of jam fills four (8-ounce jars) or eight (4-ounce jars). Jam needs sugar, pectin, and lemon (acid) to properly jell. A batch I recently made turned out runny and I figured the fruit probably didn’t have enough pectin.
Overripe fruit has lower amounts of naturally occurring pectin whereas unripened fruit has higher amounts of pectin. Go figure!
If the fruit is super ripe (like the lug of apricots I used), the jam will need more pectin to properly jell. It should be reprocessed within 24 to 48 hours. Beyond that time frame, consider other options like using the runny jam as ice cream topping.
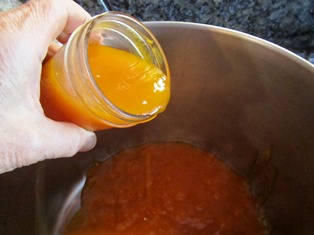
Emptying jam back into a cooking pot is the first step in repairing a batch that hasn’t jelled
The initial step in the reprocessing is to remove the rubber-seal lids and pour all the jam into a pot. Rewash the jars (they will need to be hot when you put jam back into them. You’ll want use new lids, but you can reuse the rings. Heat the rings and new lids with rubber seals in a pot of simmering water.
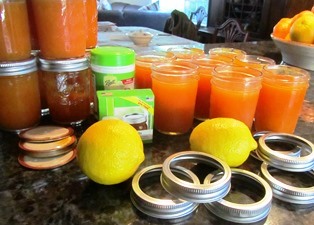
Rings can be reused when remaking the jam but its recommended to use new lids to ensure good seals
When the jars are ready to come out of the dishwasher) and the lids are simmering under water in a shallow pan, then prepare the sugar/lemon juice/pectin mixture. Also, place a metal spoon into a glass with water and ice cubes to test the jam after repairing it.
For each quart-size batch of jam, you will need 1/4 cup of sugar, 2 Tablespoons of lemon juice, 4 teaspoons of powdered pectin and about 1/4 cup of water to dissolve everything. Stir well.
Add the sugar/acid/pectin mixture to the runny jam and cook until it reaches a roiling boil, stirring with a long wooden spoon. Boil for one minute. Remove the jam from the heat.
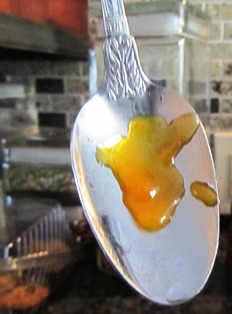
Jam is the right consistency when it coagulates rather than runs off the spoon
Test the jam for right consistency by placing some onto the stainless steel cold spoon. If it clumps and hangs, not running off, it will jell correctly.
Pour the jam into the hot jars. Wipe the mouths, if necessary to ensure a good seal. Cap each jar with a lid and ring. Process the jars submerged in a boiling water bath for 15 minutes, or according to your recipe.
I’d love to hear from you. Leave a comment letting me know if you’ve tried this process and how it worked for you. Don’t forget to tell me what kind of jam you repaired.
Harvesting Seeds from Onion Heads
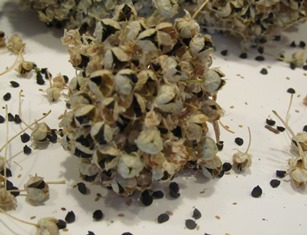
Closeup of the dried flower head of an onion with black seeds
The red and yellow onions I planted during winter here on the farmette have produced lots of fat bulbs. Now that warm weather has arrived, the plants have sent up spikes with a flower head in a process called bolting.
I’ve been using the onions in culinary creations. Now that they are bolting, I’m saving the seed heads for my next round of planting (when the weather gets cooler again).
When the seed heads I’ve collected have dried a bit, black seeds will spill out. I shake them onto paper and then store them in paper envelopes where they can dry out even more.

Newly flowered onion seed head with honeybee; see, upper right corner
The benefits of growing onions from seed rather than sets (also called seedlings) is that they perform better, are less susceptible to disease, bulb up somewhat quicker than seedlings, and store better. The seeds germinate quickly (7 to 10 days) and may be eaten in as early as 8 to 10 weeks.
Growing onions is easy. Broadcast your seed in a prepared bed when the weather is warm and all danger of frost has passed. Barely cover with soil (roughly 1/4 inch) and keep damp until seeds have germinated. If you prefer, start some onion seeds in flats to set out in the garden as seedlings.
Harvest bulbs throughout the growing season or wait until the tops flop over. Store onions in the refrigerator in a nylon stocking wrapped individually between onions to maintain freshness. The National Gardening Association has some good tips for harvesting and storing onions. See http://www.garden.org/foodguide/browse/veggie/onions_harvesting/501.
With so many onion types from which to choose, decide how you’ll use each in the kitchen and then grow various heirloom types, depending on purpose and flavor. And . . . don’t worry if next spring, you discover your onions bolting. It’s a good thing to have a seed source for such an important kitchen staple.
Germinating Seeds
On the property behind my farmette, a Sierra Live Oak tree drops acorns in abundance. The acorns sprout into seedlings, ensuring new generation of the tree.
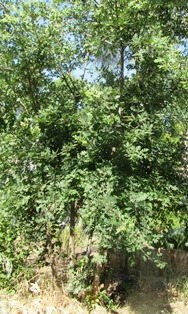
Four-year-old oak
The life cycle of the oak tree begins with acorn (the seed of the oak). As with all seeds, the acorn contains the genetic information for germinating and growing into the specific type of plant (in this case, a Sierra Live Oak).
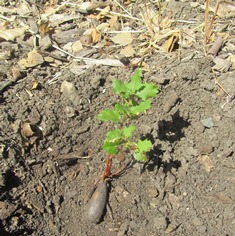
The acorn has sprouted a seedling
This is the secret of seeds, they are alive and many remain viable, able to germinate for 1-5 years. Seeds link one generation of a plant to the next. Seeds for woodlands as well as vegetable and flower gardens widely vary in size, shape, color, and the amount of time it takes for germination.
Seeds require moisture and warmth to germinate. Some–such as the flower garden varieties of columbine, petunia, begonia, and snapdragon–also require light to germinate. You would not plant those seeds under the soil, but rather scatter them on top of moistened soil or seed-starting mix.
Light, however, is not necessary for most seeds to germinate. Outside in the garden, seeds require soil and air temperatures to be warm (tomatoes need the ground’s night-time temperatures to be around 55 degrees Fahrenheit) before they’ll set up blossoms and fruit. Moisture is a requirement, too, but too much water destroys the seed.
Pre-sprouting is the process of sprouting seeds before they are planted in their permanent places in the garden. In cold climates, pre-sprouting can give plants (especially the heat lovers like tomatoes, peppers, and eggplant) a jumpstart in the spring since they are started indoors and put out when the warm days arrive.
Seed sown directly into the earth can take a week or more to germinate but seed pre-sprouted in your kitchen may take only a couple of days.
To sprout your seeds indoors, you’ll need to sprinkle them across a moistened (not dripping wet) paper towel and also cover them with moist paper towel. When inserted inside an unsealed plastic bag and placed in a warm area, your paper towel seed mat retains its moisture. Check it every day and spritz with water if necessary until the seeds germinate.
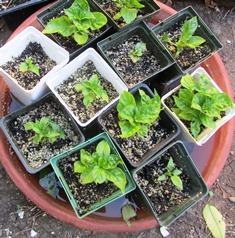
These bell pepper seedlings were pre-germinated and transferred to cells
The small plants of germinated seeds that have not yet been planted into the garden are called seedlings. Plants in cells (like the seed flats you see in nurseries) need to have two to four sets of leaves before they are ready to transplant into the garden.
Gardening becomes a fulfilling hobby when you start plants for your garden from seed and nurture the seed through the process of germination into seedlings. Flats of cell packs (usually six or eight cells to one pack) and commercially prepared potting/planting mixtures make starting seeds for your garden fuss-free and easy.
20 Interesting Facts about Honeybees
If your fruit trees, berries, and flowers are flourishing, you can be assured that bees have been busy in your garden. If you are a gardener who lives near a beekeeper, consider yourself really fortunate. Eighty percent of pollination is attributed to bees. Without these industrious little insects, Earth’s plant diversity would be in jeopardy. Here are some other interesting facts about honeybees (apis mellifera).
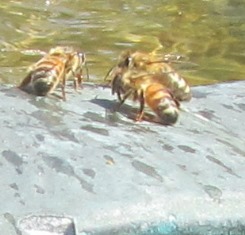
Worker honeybees drinking water on a hot day
WORKER HONEYBEES
1. The worker honeybees are sterile females. The workers keep the hive clean, serve as nursemaids to the babies, forage for food, scout for new locations, stand guard at the hive entrance, and care for the queen.
2. The lifespan of a worker bee is 6 to 8 weeks; the queen’s lifespan can stretch to 3 years.
3. In her short lifetime, an average worker bee will produce about 1 1/2 teaspoons of honey.
4. A honeybee will travel about six miles from its hive to forage on nectar- or pollen-rich plants.
5. Honeybees never sleep.
6. During one collection flight, a honeybee will visit between 50 and 100 flowers.
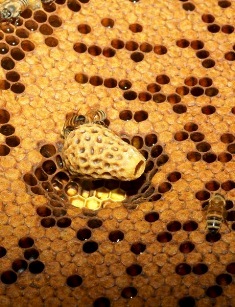
Queen cell that houses the honeybee queen who is fed royal jelly
THE QUEEN
7. A honeybee queen is made or created (as opposed to being born). Worker bees secrete royal jelly through the glands in their heads (hypopharynx and mandibular) to feed the larvae. Rich in vitamins and nutrients, the royal jelly may also contain a single protein known as royalactin and scientists believe this ingredient ensures the larva becomes a queen.
8. Newly emerged queens will fight to the death, leaving only one to rule the hive. The honeybee queen lays around 2,000 eggs. These become fully developed in 21 days.
9. The queen doesn’t leave the hive. Her job is to mate with the drones, produce eggs, and serve as matriarch of the colony.
THE DRONES
10. Drones are bigger than the worker bees but smaller than the queen and have rear-ends that are more blunted than round.
11. The drone’s sole purpose is to mate with the queen, which he does in the air. Drones die during mating.
12. Drones do not have stingers unlike the worker bees who have stingers with bee venom.
13. Drones are kicked out of the colony in the autumn when mating season in over because the honey reserves are needed to support the colony’s queen and workers through the winter. The drones are expendable since they don’t forage for food, make honeycomb or honey, care for the babies, clean the hive, or otherwise contribute to the colony.
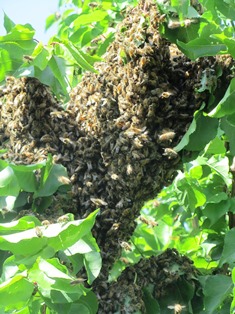
Swarms often land in trees; swarming is the method by which honeybees expand their colonies
THE COLONY
14. Honeybees communicate with each other through chemical signals. When there is a predator present, the worker bees release a pherome that communicates to her hive mates the need to attack.
15. The primary swarm (with the old queen) happens in spring and is a colony in transition. Swarming is the method by which the bees leave the hive en masse to establish a new colony. Swarming usually occurs during a two-week period in spring on warm days.
16. A swarm can include 10,000 bees but they are not in attack mode; they are preparing to move to a new home with their queen and are carrying the honey they need for the trip in their stomachs.
17. Honeybee colonies have been around for millions of years. There are fossils of honeybees in European deposits dating back 23 to 56 million years ago.
HONEY
18. Honeybees are the only insects that produce a product that humans eat. Honey is highly nutritious and has many health benefits.
19. Honey never goes bad; honey was found in King Tut’s tomb.
20. It takes more than 500 honeybees collecting pollen from 2 million flowers to make 1 pound of honey.
Scented Geranium Leaves for the Garden and the Kitchen

The scent of roses is released when the leaves of the rose geranium are bruised
Like the British monarch Queen Victoria, I am a lover of Pelargoniums, popularly called scented geraniums. Tucked in between a hedge of French perfume lavender, hydrangeas, and purple bearded iris in my garden is a rose-scented geranium with tiny pink flowers. I started it from a slip off my Lebanese-American neighbor’s plant and now it’s as large as a wine barrel. The varieties I grow aren’t just relegated to my garden; I have some in pots, within easy reach for culinary purposes.
My favorite, however, is the rose geranium. If I happen to brush against the leaves, the plant releases a heady perfume that scents the whole area like an old rose garden. Scented geraniums are actually unrelated to the true geranium of woodland habitat. The scented geraniums are of the genus Pelargonium, beloved of the Victorians, their monarch, my grandmother, and gardeners like me.
Indigenous to South Africa, the scented-leaf geraniums are half-hardy perennials in many parts of the United States. Once so popular there were 250 varieties or more, the plant fell out of favor after the Great War. Today’s gardener will find scents such as apple, apricot, chocolate, cinnamon, coconut, ginger, lemon, lime, mint, nutmeg, orange, pepper, pineapple, rose and strawberry, to name a few.
The leaves run the gamut of shapes, from deeply cut angles to round shapes that appear crinkled. Some leaves are smooth while others are leathery or velvety. The colors range from intense shades of green and yellowish-green to a reddish-purple hue. The lemon-scented Pelargonium crispum has small, green, crinkled leaves, for example, but the Pelargonium tomentosum features large and velvety leaves of a green-gray hue and yield a peppermint scent.
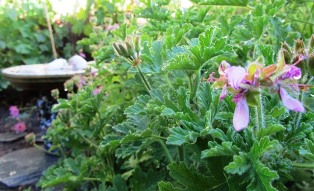
The rose geranium blooms are lovely but the plant is valued for its aromatic leaves
They need sun and a well-drained, slightly acidic soil. To propagate, take cuttings before the plant flowers. Keep the cuttings in water until roots form or put them in a planting mixture and keep moist until new leaves spr0ut.
Easy to grow, delightfully scented, with pretty little leaves and flowers, scented geraniums were beloved by our grandmothers and theirs before them. In any garden, they lend a generous helping of old-fashion charm. Plus, many of them can be used in homemade soaps and cosmetics. Cooks like them for their culinary uses as a scent source for sugars, or for tea, or as garnishes for cakes and salads and fruit dishes.
The process of making a scented sugar for tea or icing is quite simple. You’ll need a cup of sugar and a cup of leaves from a scented geranium. Try rose, lemon, or mint.
1. Gather a cupful of leaves
2. Thoroughly wash and dry the leaves.
3. Using one cup of sugar, alternate layers of 1 inch of sugar and a layer of leaves (some chefs say to slightly bruise to release more flavor).
4. Tightly screw the lid onto the jar.
5. Store in a warm place for 2 to 4 weeks
6. Remove the leaves (try sifting the sugar in a bowl to get all the leaves out)
7. Re-jar the scented sugar and use as needed.
Creating Sacred Space in Tandem with Nature

Nature provides most of the elements of sacred space, but feel free to add some garden/yard art
One of the first things I did after buying the farmette was to create a space to sit, rest, pray, and dream. Basically what I had to work with was an empty field with a tiny farmhouse in the middle. The house was a construction zone–not quiet and peaceful or nourishing to the spirit–so I need to create an outdoor sacred place for my sanity.
On the north/cool side of the house, my husband and I reinforced the fence and then planted some climbing roses, Japanese maples, hydrangeas, calla lilies, and irises. To anchor the space, we added a Cox Orange Pippin apple (a sweet dessert apple first grown at Colnbrook, Buckinghamshire, England, 1825).
Later, when I found the meditation mask, I decided to hang it on the fence, moving in a bench opposite (now my favorite place to read). A brick walkway leads to an arch that supports two Cecile Brunner climbing roses, opulently covered in tiny pink rosettes each spring. A blue reflecting ball offers a soft splash of cool color against the hydrangea pink florets. Finally, we tucked in blue-blooming dwarf agapanthus (Peter Pan) and fuchsia geraniums to give the space lushness and some cool, refreshing color.
There are many such places on our property that I’ve claimed as sacred space, but this one is my favorite. We redid the windows on the house’s north side so that the largest one looks out from our dining/living room onto this garden space. A fountain with soft gurgling water adds to the tranquility.
Besides art and possibly a water feature for your sacred space, you’ll want to think about the plants (tall, mid-size, and small), herbs, trees, climbing vines, and roses. I chose plants that I associate with my grandmother’s garden and the various gardens my mother created.
You don’t need a farmette to create sacred space. Rock gardens and arid landscapes, rooftop gardens, and cityscape corners and alleyways can be transformed as well. Work with the natural setting around you. Just stay in tune with what speaks to your spirit, gives ease to your heart, and restores peace to your mind as you create your sacred space.