How to Make Homemade Butter
A favorite memory of mine recalls my making butter with my grandmother in her farmhouse kitchen in Boone County, Missouri. All she needed was fresh cream and a jar with a lid.
My grandfather milked the cows and my grandmother would strain the liquid into galvanized cans. After the cream had risen to the top of the milk, she would skim off the cream into smaller cans, storing all of the cans in cool area at the back of the house until my grandfather could take the milk and cream to market. He always kept some back for Rosie’s homemade butter.
The buttermilk that was poured off the would then be chilled. It was his favorite drink after a long, hot day on the tractor working in the fields.
Rosie would hand me a glass jar with a screw top lid in which she’d poured a cup or two of cream and tell me to shake it. My energy and stamina would dictate how long the shaking would have to go on. She’d help. Eventually the butterfat solids and the butter milk would separate.
Rosie favored using a large glass jar with a metal lid that featured a beater and hand crank. Turning the crank beat the cream and amounted to less wear and tear on the arms. Either method worked by separating the liquid from the butterfat.
Today, beating heavy whipping cream (without additives) in a blender or mixer will accomplish the same result. The milk solids eventually become separated from the liquid, which can be poured off. The sweet creamy solid mass can then be salted and even colored if you wish, molded or shaped, chilled, and used. Also, you can leave out the yogurt and still make butter, but it won’t have that tangy flavor.
RECIPE: HOMEMADE CULTURED BUTTER
INGREDIENTS:
1 C heavy whipping cream (no additives)
1 Tablespoon natural, organic yogurt (no additives but with live cultures)
optional: 1/2 teaspoon fine sea salt
DIRECTIONS:
Pour the cream in a small to medium saucepan and warm over low heat to about 90 degrees Fahrenheit.
Stir in yogurt and remove from heat.
Cover and let rest for 24 hours on the kitchen counter to allow the mixture to thicken.
After the cream has thickened, chill in the refrigerator.
Pour chilled mixture into a blender jar or electric mixer bowl.
Beat on a low speed to reduce splatter.
Add salt, if desired.
Beat the liquid and solids separate into massive chunks.
Wrap the butter into a cheesecloth and squeeze over a large bowl to drain out the rest of the liquid. (The buttermilk makes a refreshing drink or can be used to make biscuits).
Mold by pressing the he butter into a plastic mold or an old-fashioned butter molding box. Alternatively, you can shape the butter into small balls using a melon ball scoop.
Hint: To make a flavored butter, add fresh wash, dried, and chopped herbs such as basil and garlic; or cranberries and orange zest. Or, add to the butter apricots or figs (peeled and chopped).
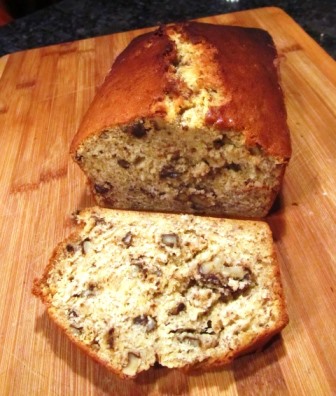
Traditional Banana-Walnut Bread
When the bananas on the kitchen counter become soft and the peels develop brown freckles, don’t toss them. Make a loaf of banana-walnut bread. This bread makes a lovely complement to a cup of steaming, fragrant Earl Grey tea.
The ingredient list for this bread is simple and the directions are easy. To start, you’ll need a 9 by 5-inch loaf pan, greased and floured; and, you’ll need to affix the paddle to your mixer. Set the oven to 350 degrees Fahrenheit. The recipe yields one loaf.
RECIPE: TRADITIONAL BANANA-WALNUT BREAD
Ingredients:
6 Tablespoons of softened, unsalted butter
1 cup sugar
1 1/2 cup mashed ripe bananas
3 large organic eggs
1/2 cup buttermilk (or 2 Tablespoons buttermilk powder dissolved in 1/2 cup warm water)
2 cups all-purpose flour
1 teaspoon baking powder
1 teaspoon baking soda
1 teaspoon ground nutmeg
1/2 teaspoon salt
1 cup walnuts, coarsely chopped
Directions:
Mix together in a large bowl the following–flour, baking powder, baking soda, nutmeg, salt, and chopped nuts. Set aside.
In the mixer bowl, cream the butter and sugar.
Add the bananas.
Add one egg at a time.
Add the buttermilk.
Pour the flour into the banana mixture and mix a little at time until the ingredients are all combined.
Fill the floured and greased loaf pan with batter until the pan is roughly 2/3 full.
Bake for approximately 55 minutes or until a toothpick inserted into the batter comes out clean.
*Tip: ripe bananas can be peeled and stored in a zip-lock freezer bag and frozen.
 Facebook
 Goodreads
 LinkedIn
 Meera Lester
 Twitter


