You are currently browsing the archives for the Foods category.
Blogroll
 Facebook
 Goodreads
 LinkedIn
 Meera Lester
 Twitter
SITE VISIT COUNTER


Archive for the 'Foods' Category
California’s Agricultural Wealth on Display in Its Farmers’ Markets
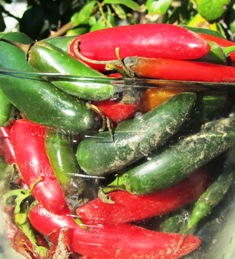
These locally grown chilies turn red when ripe
California is especially blessed with rich soil and that lovely Mediterranean climate with the near-perfect amount of heat and chilling that our agricultural products require.
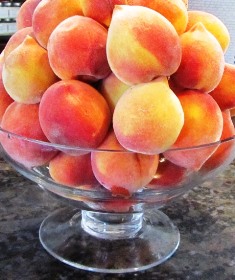
Just picked from the tree, fresh Elberta peaches
You might not know that Northern California leads the nation in production of nearly three dozen different commodities, including artichokes, strawberries, peaches, and walnuts. Many products can be found at local farmers’ markets. See http://www.pcfma.com/
Our state offers more than 350 farmers’ markets and many are year-round. With growing interest in healthy eating as advocated by First Lady Michelle Obama, whose position about the importance of healthier food for kids and their families has been highly publicized, community participation in local farmers’ markets is growing.

Ripe cherries can be eaten fresh, made into preserves, or mixed with oranges for a marmalade
Buy fresh and buy local. I love that adage because in practice your dollars spent at farmers’ markets or in direct purchases from farms preserves our farmlands, local growers, and small businesses selling locally grown fruits, vegetables, berries, nuts, and citrus.

Bowls of citrus and persimmons
The Pacific Coast Farmers’ Market Association has produced a comprehensive listing of agricultural products available in our area for each month of the year. I’ve recapped the list of vegetables here. The fruit and berries will be the subject of a future blog.
Asian Vegetables: January-December
Asparagus: March-June
Beans: January-December
Broccoli: January-December
Brussels sprouts: January-March; September-December
Carrots: January-December
Cauliflower: January-June; October-December
Celery: January-December
Corn: July-September
Cucumber: May-November
Eggplant: May-October
Garlic: January-December
Lettuce: January-December
Mushrooms: January-December
Onions: January-December
Parsnips: January-May; October-December
Peas: April-October
Peppers: May-November
Potatoes: January-December
Spinach: January-December
Squash (summer): May-September
Squash (winter): January-February; October-December
Sweet Potatoes: January; September-December
Tomatoes: May-October
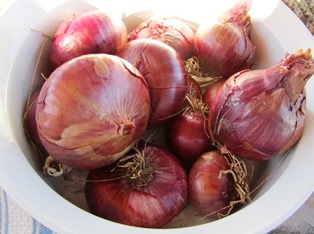
Red onions grown from sets laid onto the dirt and barely covered with soil produce bountiful crops
Help preserve California’s rich heritage of plant diversity. Support your local farmers’ market by buying fresh, often just-picked vegetables and fruits, the result of our long growing season and rich soil. You’ll be supporting our state’s farmers and growers.
Divine Desserts and Holiday Cheer

The baskets are filled with fudge, jams, honey, fresh fruit, and other treats
We decorated festive holiday baskets for family and friends this year, filling them with tangerines and oranges from our trees, juicy apples, jars of summer fruit jams, and honey. Of course, no holiday basket would be complete without a batch of homemade fudge, some sugar cookies, and bottle of apple cider or a favorite cordial.
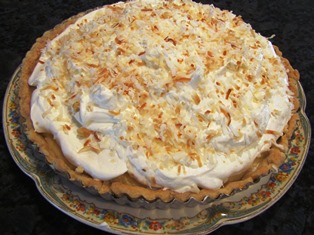
The coconut cream pie piled high with whipped cream and toasted coconut is always a hit for a Christmas dessert
Some of our baskets were delivered on Christmas Eve; others we took with us to a family gathering on Christmas day. I’ve been told that the baskets are much appreciated, more so, since they include homemade treats made with love.

Holiday cookies are always fun to decorate
Christmas Eve day my son and I spent most of the day in the kitchen, baking and decorating the cookies, toasting coconut for the pie, and assembling the trifle for our Christmas day dinner.
The trifle bowl went missing this year (we think it was mistakenly taken home by someone after our Thanksgiving feast). But it didn’t really matter since we could make the trifle and put it in any glass bowl that might be deep enough to hold the layers of pound cake and seven cups of various fruits and berries.
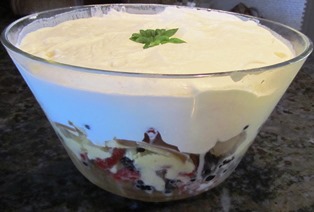
The trifle still looks pretty, even if the trifle bowl went missing this year
We didn’t cook the Christmas dinner this year–my daughter did. But we supplied some a few desserts and a lot of Christmas cheer. Some might say we were blessed with beautiful weather (hovering close to 70 degrees Fahrenheit), but I’d say it’s a mixed blessing–those high, firm peaks of whipped cream in on the trifle and pies will surely soften and sag during transport. But the desserts will still taste divine.
Eggstra Confusing Egg Labels

Some chickens have caged runs, but are also allowed to free-range forage
Just because an egg is organic and from a cage-free chicken does not mean the eggs are free from Salmonella Enteritidis (the bacteria that causes the foodborne illness) or that the chickens producing the eggs live free of confinement.
Supermarkets carry dozens of eggs with labels like pasteurized or organic and also free-range, cage-free, or vegetarian. Consumers can find it confusing, so here’s the low-down on eggs and their labels.
CAGE FREE
This term relates to how the chicken is confined. The chickens are not raised in cages but may be confined in barns with floors. The floors may have pine shavings or other material and the chickens will likely have nesting boxes in which to lay eggs and roosts. But cage free does not necessarily mean they have lots of space; they could be living in close confinement with many other birds, depending on the farm.
ORGANIC
In order to get the USDA certification for organic on the eggs, the chickens must not be given hormones, antibiotics, and other drugs. The hens can be caged or otherwise confined, but usually they are cage free and eat an organic diet. The USDA stipulates that to qualify as organic eggs, the layers must be fed an organic diet of grains from land deemed free from toxic chemicals and pesticide for a minimum of three years and no grain from genetically-modified crops.
FREE RANGE
Chickens considered free range are able to leave their confinement and roam freely. Depending on the farm, the birds may be under a protective covering like a canopy. This keeps the flyers from escaping and the hawks from carrying away the birds. Free-range chickens might have a richer diet, again depending on the farm, because of greater access to freely foraging on grasses, grains, and seeds.
VEGETARIAN
How, you might wonder, can a chicken be deemed vegetarian when they naturally forage for grubs and worms? They are confined in cages and fed a vegetarian diet, free of animal and fish by-products.
PASTEURIZED
The eggs containing a pasteurized label have been put through a heating process while still in their shells. For three and one-half minutes, the eggs are heated to 140 degrees Fahrenheit, thereby killing the Salmonella bacteria. Pasteurized eggs are preferable for the diet of young children, elderly people, and those who have weakened immune systems and for whom a salmonella infection might have grave consequences. Even if you don’t buy pasteurized eggs, you can eliminate the risk of Salmonella infection if you cook the egg yolk and white until firm.
SAFETY TIPS
Eggs collected from your hen house should be washed within 36 hours of being collected and immediately refrigerated at 45 degrees Fahrenheit or below. These two steps can reduce the risk of Salmonella. Refrigeration prevents the bacteria (if present) from multiplying. Eggs purchased from the store should be immediately refrigerated. And if a recipe lists a raw egg as an ingredient (for example, mayonnaise or salad dressing or cake frosting), use pasteurized eggs or egg whites.
An egg from a pasture-raised hen is much more nutritious than an egg from a large commercial enterprise, according to Mother Earth News. The publication did a study in 2007 that measured how eggs from pastured hens stack up against the USDA’s nutrient data for commercial eggs. The results suggested that eggs from the pastured chickens were nutritionally superior. For the full story, see, http://www.motherearthnews.com/real-food/tests-reveal-healthier-eggs.aspx
• 1/3 less cholesterol
• 1/4 less saturated fat
• 2/3 more vitamin A
• 2 times more omega-3 fatty acids
• 3 times more vitamin E
• 7 times more beta caroten
It might be time to acquire a few more chickens if you love eggs as much as I do, especially in those big, mid-day farm table breakfast/lunches, with fresh veggies from the garden, and homemade bread and jam.
Easy Orange Marmalade
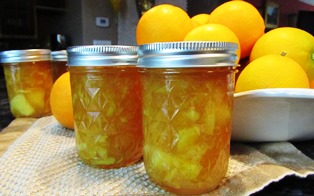
Jars of orange marmalade make lovely holiday gifts
Who can resist the flavors of homemade jams? Whether it embellishes an appetizer of grilled fig and melted goat cheese or is spread upon a fat slice of fresh-baked bread, jam has power to elevate any meal to another level.
Using the seedless oranges growing on our farmette trees, I’m making marmalade. Marmalade made with the oranges ripening this time of year make great additions to holiday gift baskets. I like to add jars of honey, fresh tangerines, nuts, summer jams, and homemade treats.
RECIPE FOR ORANGE MARMALADE
Ingredients:
4 large oranges (preferably a seedless variety)
2 medium lemons
1/2 teaspoon butter (to reduce foaming)
1/8 teaspoon baking soda
6 Tablespoons dry classic pectin
5 1/2 cups sugar
Directions for Preparing the Jars and Canner:
Wash pint jars in the dishwasher or wash the jars and screw rings in hot soapy water, rinse, and drain upside down on paper towels.
Remove the wire rack from the canner and set aside; then, fill the canner half full of water and bring to a simmer.
Directions for Making the Fruit Mixture:
Wash the oranges and lemons.
Peel the fruit, using a vegetable peeler or a sharp paring knife. Discard any seeds and the pithiest parts of the inner peeling as the pith tastes bitter.
Cut the peeled skins into narrow strips.
Pour water into a saucepan.
Add baking soda and strips of peel.
Bring to boil and then reduce the heat, simmering for 20 minutes and stirring as needed.
Cut the fruit into thin quarters.
Add the fruit and juice to the saucepan of simmering peelings, cover, and allow everything to simmer for 10 minutes.
Remove 4 cups of the fruit/peeling/juice mixture and pour into a large saucepan (6 or 8 quart) or stock pot.
Stir in the pectin and add the butter and sugar, mixing well.
Bring to a roiling boil, stirring constantly, for a full minute and then remove from heat, skimming off any foam.
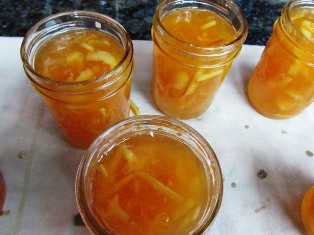
These jars are filled with hot fruit mixture, ready for lids and canning
How to Can the Marmalade:
Ladle the fruit mixture into the warm, clean jars, leaving between 1/4 and 1/8 inch space from the top.
Wipe the jar rims before placing the jars on the wire rack of the canner.
Lower the wire rack of jars into the simmering water in the canner.
Make sure the jars are covered by 2 inches of water (add boiling water if necessary).
Cover with lid and boil for 15 to 20 minutes.
Turn off flame, remove the jars of marmalade, and set them onto a towel to cool.
Listen for the popping sound that signals the lids have sealed. Check lids for seal once the jars have cooled by pushing against the center of the lid. If it springs, the jar has not sealed and must be refrigerated. The marmalade will still be good to eat.
A Roving Thanksgiving Starts with Snacks on the Farmette
The spontaneous invitation my husband made to friends to stop by for a Thanksgiving snack and beverage before the “real” meal started sent me scrambling. What was he thinking? We were celebrating with all the relatives at my daughter’s home, not ours, so how could I host a pre-party gathering? He assured me we could make it work if we kept it simple.
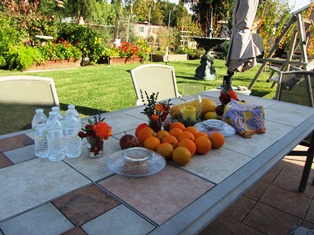
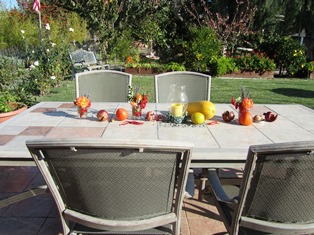
The weather cooperated, so we gathered for a pre-Thanksgiving social in the garden
Our friends were scheduled to dine at a neighbor’s house in the late afternoon but decided they would come by our place first. I figured such a short visit of an hour or two wouldn’t require an elaborate meal . . . we would snack on crackers and goat cheese, drizzled in a sweet cranberry sauce; pumpkin cream cheese rolled in nuts; and a torte of goat cheese with a layer of pesto, sun-dried tomatoes, and finely chopped pieces of olive. We would offer bottled water, sparkling cider, and a wine to wash it down.
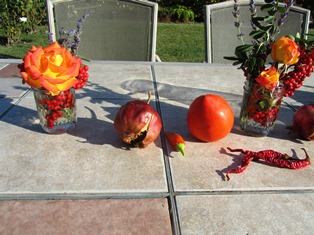
I gathered what was growing on the trees and in the garden to decorate an autumn harvest-looking table
Our Northern California weather could not have been lovelier, so I decided we would sit outside in our garden. I combined red pyracantha berries with blooming red-gold roses and some spikes of purple French lavender in jam jars for a harvest festival look on our patio table.
Decorations for the table began with a few pomegranates, persimmons, chilies, and onions–all readily available on the farmette
Our friends arrived and, after a short time in our tiny farmhouse, followed me to the garden. We had a lovely visit while the blue jays, crown sparrows, morning doves, and black phoebes entertained us with their antics. I think I enjoyed the day all the more for having a chance to socialize a bit in the garden before sitting down to the big feast with all the relatives. Next year, I might actually plan to do a roving Thanksgiving with several parties. It was so much fun!
Oats–Farm Cooking Staple Lowers Cholesterol
Steel-cut (Irish) and stone-ground (Scottish) oatmeal has a place on my pantry shelf alongside a container of quick oats. Steel cut means the groats (oat grains) get cut by a steel blade after they have been hulled. The groats of stone-ground oats are cut even smaller than the steel-cut and ground. See http://wholegrainscouncil.org/whole-grains-101/types-of-oats
In rolled oats, the groats are further flattened into flakes. But whether you eat steel-cut oatmeal that takes up to a half hour or more to cook or rolled oats that cook in minutes, you can take comfort in the fact that you are doing something good for your body.
Studies have shown that oatmeal can lower cholesterol, and lower cholesterol reduces the risk of heart disease. Steel-cut oats taste about the same as quick oats and nutritionally, the two two are also similar. See http://www.mayoclinic.com/health/cholesterol/CL00002e
Growing up n a farm, oatmeal made its way to our table on a regular basis. The women in our family also used oatmeal to create sweet treats–cookies and old fashioned deserts. Their crumbles, crisps, and betties incorporated oats in a pastry type topping laid over fruit and baked.
A crumble topping that adds oatmeal and nuts to the flour is known interchangeably as crumble or crisp. Betty is the name applied if the fruit used is an apple variety prepared with sugar, spices, and bread crumbs. The term dates to Colonial America. Sugar sweetens the crumble and butter makes it hang together in a pastry with a crumbly texture.
Here’s an example of how oatmeal might be used in a fruit crumble, crisp, or betty recipe. After sprinkling the topping onto the fruit, the dessert is baked at 375 degrees Fahrenheit for 30-35 minutes.
Ingredients for fruit filling:
6 cups cherries, apples, pears, mixed berries, or other fruit
1 cup sugar (or more, if the fruit is very tart)
1 teaspoon lemon juice (keeps the fruit from turning brown)
1 teaspoon cornstarch (use more if the fruit is very juicy and requires a thickening agent)
1 teaspoon spice such as nutmeg, ginger, or cinnamon, depending on the fruit used
Directions:
Mix fruit and ingredients together and pour into a baking dish.
Ingredients for the crumble/crisp topping:
1 cup flour
1/2 cup oats (optional)
1/2 cup chopped nuts (optional)
1/2 cup brown sugar
1/2 teaspoon baking powder
1/4 teaspoon salt
1/4 teaspoon spice (like cinnamon or ginger, depending on the type of fruit used)
1/2 cup butter (8 Tablespoons)
Directions:
Mix together the dry ingredients and cut in the butter until crumbly. Sprinkle on top of the fruit and bake for 30-35 minutes.
“Fruit of the Gods” Ready To Eat Now
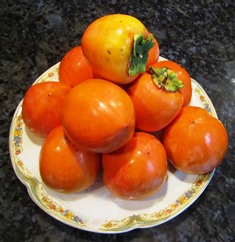
Succulent, sweet, and juicy, ripe Hachiya persimmons are worth the wait
If you love persimmons, it might interest you to know they are from a genus known by the Greeks as Diospyros kaki, “fruit of the gods.” But these sweet fruits must be fully ripened before consuming. The Fuju and Hachiya are the two main types grown in Northern California gardens. My favorite is the Hachiya; it has to be one of the most sensuous and luscious fruits on the planet to eat.
The Fuju fruit is more like an apple in shape and texture. You can differentiate it from the Hachiya because Fuju is squat and firm-fleshed, reddish yellow, and about the size of a baseball whereas the Hachiya fruit is pendulous-shaped, soft like an overripe plum, orange-scarlet in color, and about the size of a hefty apple or softball. Tamopan is a larger persimmon with a shape like a turban whereas Chocolate is so-named for its brown streaks; its flesh is quite sweet.
Persimmon trees look stunning in a garden, possessing outstanding ornamental qualities. They are relatively pest-free and produce consistently when mature. These small trees are easy to grow, have striking foliage and interesting branch structure, exposed after the leaves have fallen in autumn. They can even be espaliered against a frame or wall.
Hachiya persimmons are astringent on the tongue unless eaten when they are fully soft-ripe. Birds love them, too, so you have to pick them before they are pecked. Ripen in the kitchen before eating or cooking with them. If you want to dry persimmons, pick while the fruit is still firm and with some stem. Tie a string around the stem and hang in the sun until the fruit becomes dried. It will taste something like a high-quality prune or lichti.
Not-So Spooky Halloween Cookies the Kids Will Love

Let the kids decorate these not-so scaredy cats, using colors they like. Add orange or black sprinkles to finish.
When you let the young ones in your family choose the cookie cutter shapes and icing colors, you’ll get plenty of helping hands making cookies for Halloween. I make these cookies a lot; they are perfect for any holiday and also for children’s tea parties. Just change the shape and bake and decorate.
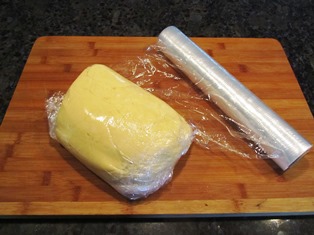
Wrap the dough ball before chilling
After making the dough, wrap in plastic and refrigerate for at least an hour to make the dough a bit firmer for rolling out.
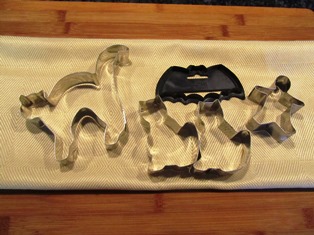
At my house, the favorite shapes for Halloween are cats and bats
Half the fun is dumping onto the counter an assortment of cookie cutters and letting the kids choose their favorites. For Halloween, they might like ghosts, cats, bats, witches, and pumpkins. Help them roll out the cookies and place them on the cookie sheet for baking.
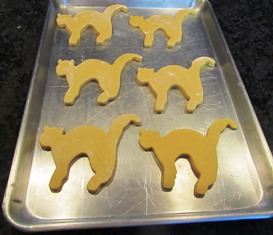
A tray of cat-shaped cookies ready for the oven
Sugar Cookie Recipe
Ingredients:
1.5 cups butter (softened if cold)
2 cups granulated sugar
4 large eggs
1 teaspoon vanilla
5 cups white all-purpose flour
2 teaspoons baking soda
1 teaspoon salt
Directions:
Cream butter and sugar together.
Slowly beat in eggs and vanilla.
Add flour, baking powder, and salt and mix together until thoroughly blended and dough can be shaped into a ball.
Cover with plastic wrap and chill in the refrigerator for at least one hour. You can also chill the dough overnight. If you don’t want to make the cookies all at once, then divide the dough into two balls to use when you want.
Preheat the oven to 400 degrees Fahrenheit.
Sprinkle flour onto a flat surface and roll out the dough to roughly 1/4 inch thickness.
Cut into shapes using your favorite cookie cutters. Arrange cookies on a baking sheet leaving 1 inch between cookies.
Bake 7 to 10 minutes.
Let cool before icing with your favorite sugar cookie icing.
A drop or two of food coloring can give you various colors of icing; , just be sure to put icing in separate bowls before adding the food coloring. Use a pastry bag with tips or even a toothpick to make designs on the iced cookie. Decorate with sprinkles.
Rustic Pluot or Plum Tart with Italian Crostata Crust
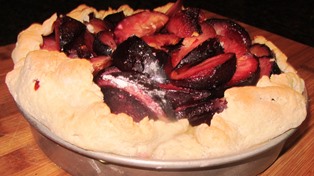
Pluots or plums are first drizzled in lemon juice and dusted with flour, then placed into the tart with bits of butter
The farmer’s market has the dark purple-black plums and pluots in abundance now, so I thought I’d buy a few and whip up a rustic summer tart, Italian style.
I like the rustic tarts with the Italian style crostata crust because they are easy to make and the tart tastes so buttery and flaky. This recipe uses butter and also cream cheese that gives the tart a special lightness. For the filling, I used pluots for this one, but you could also use ripe plums.
To make the dough, I find it easier to just put the ingredients into the food processor with a steel blade and pulse a few times, adding ice water as needed.
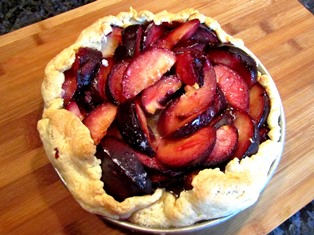
The finish tart is best served warm
Ingredients:
8 ounces cream cheese
2 sticks butter (1 cup)
2 cups flour
½ teaspoon salt
1 teaspoon cold water
6-7 large sweet pluots or dark plums
Juice from ½ medium lemon
2 Tablespoons butter
2 Tablespoons flour
Directions:
Preheat oven to 375 degrees Fahrenheit.
In a food processor with blade, process cream cheese, butter, flour, salt, and water into a ball.
*Roll out on a lightly floured surface in a circle to about ¼ inch thickness and 2-4 inches larger than your tart pan.
Place dough in a tart pan and pre-bake 10 minutes.
Wash, cut, stone, and cut pluots/plums into quarters.
Combine with lemon juice.
Toss with flour. If plums are juicy, you’ll need a bit more flour to absorb all that juice.
Cut butter into pieces and scatter around the plums as you layer the slices in the pan on top of the crostata dough.
Fold extra dough loosely back over the plums; it should not reach the center because you want a rustic look to the baked tart.
Bake for 30-45 minutes until pluots/plums are soft and dough is golden brown.
Serve warm with a dollop of whipping cream or a good vanilla ice cream.
*Avoid over-handling the dough as it will become tough.
Melt-in-Your-Mouth Scottish Shortbread
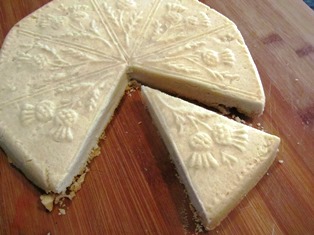
My Scottish shortbread bearing the traditional thistle pattern
Warm Scottish shortbread and tea are two of the simple pleasures of life.
Scottish shortbread, that buttery biscuitlike treat that Scottish cooks are famous for serving at teatime, doesn’t require a lot of ingredients; it’s basically flour, butter, and sugar. Of course, the dough can accommodate other additions, for example, bits of dried fruit, chocolate, caraway seeds, lemon zest, chopped dates, and nuts. I like it best plain.
I have many recipes for shortbread. Some are from magazines or books devoted to the subject of Irish or Scottish culinary traditions or foods of the British Isles, acquired during my travels to the lands of my ancestors, namely, Scotland, Wales, and Ireland.
With shortbread, more butter, less flour produces a richer biscuity cookie. It’s helpful to remember the basic 2-4-8 formula, that is: 2 ounces of sugar, 4 ounces of butter, 8 ounces of flour, plus a pinch of salt. Mix together, press into a mold, and bake 45-60 minutes in a 325-degree Fahrenheit oven until golden. Dust with sugar.
The following is my favorite recipe, slightly different. It is pictured above. Feel free to add to it your favorite ingredients.
Ingredients:
1/2 cup powdered sugar
1/3 cup rice flour
2 cups all-purpose flour
pinch of salt
pinch of baking powder
1 cup unsalted butter
Directions:
Preheat the oven to 350 degrees Fahrenheit
1. Put dry ingredients into a mixing bowl.
2. Add butter and cut in with a butter cutter or knives until it is thoroughly incorporated into the dough.
3. Knead the dough 2 minutes on a lightly floured surface.
4. Divide dough into two, roll into balls, and cover both in plastic wrap.
5. Chill for one hour.
6. Knead the dough balls back together to soften and then roll out to about 1/4 inch thickness.
7. Press into a shortbread mold or cut into shapes with a cookie cutter.
8. Bake for 15 to 20 minutes or until the dough is golden and cooked through, if using a mold. For cookies, bake on ungreased baking sheet.
9. Dust, if you like, with fine granulated sugar (also called castor sugar).