You are currently browsing the Henny Penny Farmette weblog archives for November, 2012.
Blogroll
 Facebook
 Goodreads
 LinkedIn
 Meera Lester
 Twitter
SITE VISIT COUNTER


Archive for November, 2012
Lots of Peppers and Sunflowers Hanging Around
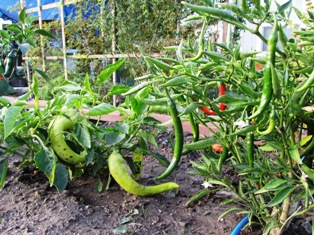
Peppers for my Mexican and Caribbean cooking
My pepper plants are still producing. It’s a week before Thanksgiving and by this time last year I had harvested all the warm season crops like the peppers. But the plants still have many peppers hanging and are still blooming.
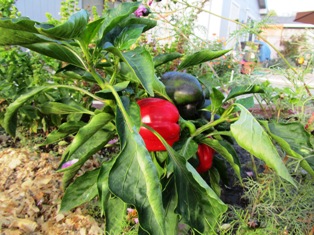
Sweet red and green bell peppers
I even have a tomato plant that’s got blooms on it. Of course, most old timer gardeners will tell you that tomatoes won’t set fruit if night-time temperatures aren’t 55 degrees Fahrenheit or higher. So I’ll wait for another week or two to figure out whether or not to pull out the tomato and harvest the peppers. I can use the sweet bells in my Thanksgiving dinner prep.
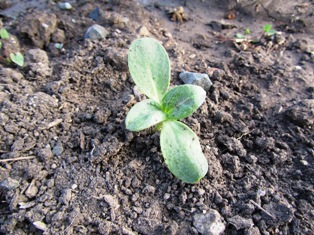
A giant sunflower starts as a small seedling
Yesterday, I laid out on a small stone floor a giant sunflower head that had already dried. The birds, and especially the squirrels, love the seeds. The squirrels practically replant them for me all over the property. The giant sunflower heads laden with seed are my gifts to the wildlife each autumn.
There are sunflowers and then there are the giants that stand seven or eight feet tall with heads the size of dinner plates. The stalks are as thick as the diameter of a coffee mug. It usually takes me a few hours of working with a pick axe to dig out all the stalks and compost them.
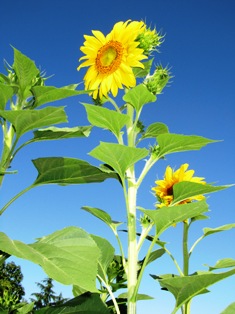
Picture postcard-perfect giant sunflowers
I save the seeds from the giants so I can let them dry over the winter and plant again the next year. I’m just guessing but I’ll bet from all the seed heads I’ve saved, I’ve got thousands of seeds. Maybe I’ll package up 50 or so to a bag and give them away at Christmas or sell them at the farmer’s market when it starts up again next year. For now, I’ve got my sights set on making some pepper relish for Christmas season gift baskets of food.
Backyard Bird Watching Soothes the Spirit

Finches dining on small black seeds known as Niger seed
Back in my old neighborhood I spent many happy hours watching the birds that flew into the massive pines behind my San Jose home. Then when I moved to the Miami area, I felt thrilled to spot a long-legged, white egret, a small but determined sandpiper, or a bald eagle or two visiting my home on the lake. The visits of those exquisite creatures were always brief and all too soon they would fly back to their nests in the brush or tall pines of the Florida Everglades, only a mile or two away. Now here on the Henny Penny Farmette, I am serenaded every morning by songbirds, often sweet little yellow finches feeding at the feeder five feet above the fence at the back of the property.
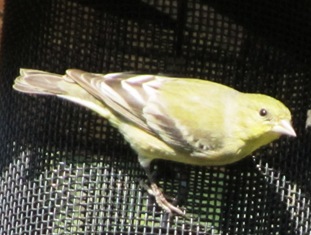
Closeup of a wild finch, bright eyed and curious
If you feed them, they will come. Finches love the black nyger seed. Our local feed store sells the seed in bulk and also in white mesh sacks with tiny holes perfect for finch beaks, which are quite small. Of course, some seeds will drop to the ground and, in my experience, easily sprouts and grows into a tall, skinny plant with a blue bloom. I’ve heard that you can sterilize birdseed so it would not root and grow if you toast the seeds for a short time in the oven on high heat. But be careful not to burn them. Not even birds like burnt food.
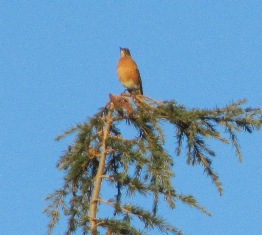
A robin surveys the world from the top of a tall pine
While making coffee this morning, I peered out the kitchen widow to see a beautiful bird with a rust colored breast perched atop the fifty foot pine. I believe it was a robin. Grabbing my camera, I got off a couple of shots before the bird took flight. I’m pretty sure I haven’t seen the last of that bird. Rain is coming again in a few days and robins love to hop around searching for worms. So regardless of what neighborhood I’m living in, I create habitat and put out food for the wild birds. It welcomes them and their presence nurtures my spirit.
Shelter for the Birds

A rustic, simple birdhouse has attracted a lodger
An old birdhouse made by the Boy Scouts seemed like ornamental yard art until we attached it to a pole on the back fence and planted the Sally Holmes climbing rose beneath it. When early spring rolled around, we noticed a fine little specimen of a bird began flitting about the little wooden birdhouse. He liked the proximity of the house to perching places, among them, the climbing rose and nearby fig, apricot, and pepper trees.
The amenities were also nice. There was the birdbath below in the middle of a flower box, plenty of seed in the bird feeder, and clumps of bushes in which to flit about. He and his lady friend promptly moved in and began building a nest.
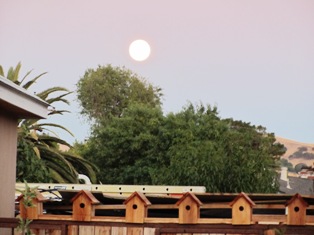
Moonrise over a row of birdhouses next to our chicken house
My husband Carlos, the architect, decided to refine the birdhouse with a snazier design. He used painted boards. But the birds liked the rough-hewn, unpainted wood of the house the Boy Scouts had made. Other birds came to check out the new row of houses, but so far none have moved in.
Carlos has remained undaunted. These little birdbrains just didn’t appreciate the beauty of what he was trying to give them, he reasoned. So he created what we have begun to call “the low rent district,” a series of unpainted birdhouses of simple design built together onto a trough that Carlos fills with seed to attract them. So far, this cluster of houses out in the open do not seem to have the appeal of the more rustic one atop the pole on the back fence.
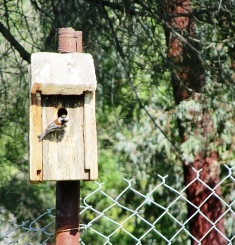
Checking on the family inside
Birds like security and safety for their nests, just as humans do. Hence, location of a birdhouse to woodlands and brush-filled fields is preferable to a birdhouse out in the open. The entrance into the birdhouse (the hole) size is equally important. Our little feathered lodger doesn’t want a nasty blue jay or other marauder raiding the nest he and his mate have painstakingly built for their eggs and hatchings.
Lately, we’ve noticed the little bird who moved in last year (and filled our yard with lovely song) is back. It’s only November, so he and his mate must be planning an early move-in, maybe before other birds notice the house is currently unoccupied. What’s that old adage, the early bird gets the worm? Well, around here, it’s the prime real estate; unless, of course, you don’t mind living for a bit in the “low rent district.”
Iris Reward with Sensational Spring Blooms
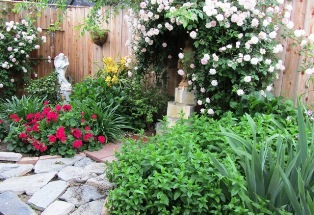
Small corner of a garden with iris, mint, geranium, and roses
Few flowers do the double duty of iris in a flower garden. They provide a great background for other flowers and also produce exquisite blooms on their tall stems. Both bearded and beardless iris plants provide textural interest for other perennials, annuals, and herbs, whether in a formal or informal flower bed, along a walkway, or tucked into a corner of a garden.
Iris produce their blooms on stalks that emerge from clumps of stiff, erect, spiked, and pointed green leaves. My iris plants were a gift from the neighbor who owns the property behind the Henny Penny Farmette. The bulbs she gave me had originally been planted by her father and mother, both now deceased. We were thrilled to get the bulbs.
When we planted them on our property, we made sure the soil was amended and we sprinkled in some bone meal and watered well. Then the iris were left alone. We did apply mulch prior to the winter rainy season and because here in the inland valley of the east bay, we can get freezing nighttime temperatures. Those iris plants have rewarded us with spectacular blooms in April each year.
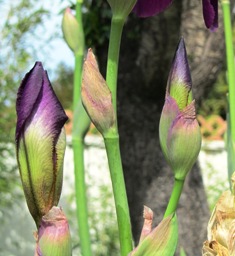
Iris blooms about to open
We didn’t know if the bulbs would produce a true blue bloom or some other color, so the anticipation was killing us that first year. Then the buds emerged on tall (roughly three foot stalks) and we could see what was coming. I have to say, the blooms bedazzled us.

Iris blooms above tiny white bacopa
Plant height separates the bearded iris into roughly five groups: miniature dwarf, standard dwarf, intermediate, miniature tall, border, and standard tall. Our iris plants fall into the standard tall category. The best time to plant the iris rhizomes is from July to September 15. Set the rhizomes just beneath the soil surface as they do not like being planted too deep. In really cold areas, a thick layer of mulch ensures the rhizome survives alternate freezes and thaws. Lift and divide the rhizomes right after blooming. You can cut the leaves back to six inches for ease in handling the plants.
A note about rhizomes: These thick horizontal stems generate roots from the bottom and the plant’s leaves and flowers emerge from the top. Some plants that grow from rhizomes are bearded irises, calla lilies, and cannas.
Roses Add Romance to a Garden
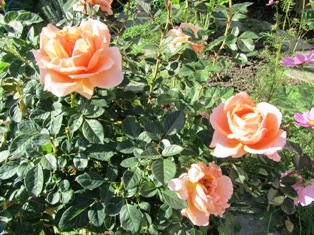
Abbaye de Cluny, romantica hybrid tea rose
Meibrinpay PP#9609
Years ago, I wrote a book about interior decorating using flowers and floral motifs. I drew upon my appreciation of flowers to research and write that book with gal pal A. Bronwyn Llewellyn, author of Goddess at Home (interiors inspired by Greek goddesses). Because I so love the faded elegance of an English country motif where chintz and vintage floral designs reign supreme, I have included many types of old floral favorites as well as rose bushes around the Henny Penny Farmette.
Abbaye de Cluny (pictured above) seems to enjoy being tucked in a bed that includes French perfume lavender, rose geranium, cosmos, and Spanish lavender, and has become my favorite rose. It displays its splendor in the garden near my patio door where I can gaze upon it often. My son Josh gave me this rose for Mother’s Day 2011. Abbaye de Cluny offers a spicy citrus scent and about 30 petals in each apricot bloom. When mature it will reach four feet tall and spread to three feet wide. It likes full sun and well-drained soil. Abbaye de Cluny is a super easy rose to grow.
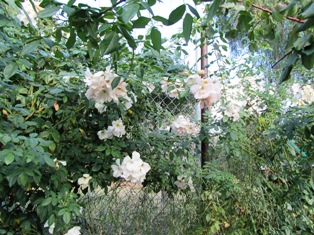
Climbing Sally Holmes, a Jackson Perkins rose
Another lovely rose that I started from a cutting, using root hormone and sticking the cutting directly into the ground as the winter rains started, was Climbing Sally Holmes. In two years, that rose has evolved into a ten foot bush that sprawls on the back fence. I’ve since taken other cuttings from it and started that rose in other areas. This Jackson & Perkins rose is a antique hybrid musk with three and one-half inch, long-lasting blooms. It provides drama for any setting, but especially a garden sitting area.
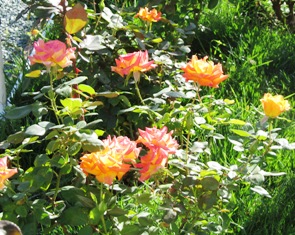
Redgold, a compact floribunda
For me, a rose gives two gifts–its scent and its bloom. I usually won’t plant a rose that doesn’t hold the promise of both, however, I made an exception with a floribunda named Redgold. This rose is a show-stopper with its fiery dual coloring of red and gold. Its petal count is around 25 on blooms that are much smaller than the Abbaye de Cluny. But in a flower bed that includes climbers and hybrid teas, this rose holds its own. It likes to be feed a fish emulsion tea; I only water it as needed.
I do not spray any of my roses and because there is a healthy ecological balance in my garden (lots of lady bugs and praying mantises to feed on aphids and other pests), so far the roses are performing beautifully without human intervention.
Hardy Rhubarb Heralds Spring

Leaves unfurling from newly planted rhubarb
I will never forget the long and tortuous Missouri winters of my youth when for days on end the gray sky seemed to hang as low as the horizon line. With hope and great anticipation of nature’s renewal, I waited on spring. Inevitably I would notice the green shoots of tulips, grape hyacinths, and paper white narcissus pushing up through the cold earth.
Gradually, the gray lifted revealing blue. The earth warmed. The strawberries swelled and ripened. The spring peepers kept a chorus down by the pond. Then, inevitably, my grandmother would grab a basket and motion for me to join her in the garden. There we twisted and pulled thick red stalks of rhubarb–one of the earliest vegetables of spring–for pie-making. Grandma always served a dessert at every meal, even breakfast when the white icing she had slathered on just-baked cinnamon rolls would cascade down like melting snow.
So it might not come as a surprise to people who know me that when my husband and I talked about what vegetables we would include in our Henny Penny Farmette garden, I told him rhubarb for jam, jelly, and, of course, pies like my grandmother used to make. We waited until our second year here to put in the rhubarb, and we will let the plants grow for at least a year before harvesting. Next spring, we expect to be able to harvest stalks that are at least an inch thick, possibly for one to two months.
If you’ve never grown rhubarb, you need to know that rhubarb leaves are poisonous. Only the celerylike stalks, with their tart (but also sweet) flavor are used for cooking. You also won’t grow rhubarb from seed but rather from root divisions obtainable at your local nursery. Plant the root divisions (also called crowns) in holes that are about three feet deep and three feet wide and include compost and aged manure with soil. Use mulch to keep the roots moist and to protect them during a hard freeze.
I love the elephant ear-sized leaves and the red stalks (although the stalks can also be green). Best of all, the plant is easy to grow and almost pest free. My favorite variety of rhubarb is the Cherry Red because it is a prodigious producer and has an intensely sweet flavor.
Boxes To Grow Just about Anything

Carlos building a planting box
When we arrived at the Henny Penny Farmette our first summer here, the weeds on the property towered over our heads. We knew it would take a lot of work to change the wild, chaotic landscape into something beautiful. After we pulled more weeds than we ever want to remember, we planted a garden, started a bed of herbs, and (during the following bare root season in late January) put in an orchard. That rainy season we had 21 straight days of rain.
My husband Carlos had left to visit his family in the Dominican Republic. The rains didn’t let up. I feared the septic would overflow, take down the young trees, and destroy our herb beds. Near the end of that rainy period, the water level rose high enough to threaten the door into the house. Then the rain stopped.
When Carlos returned, he hired some workers to help us reconfigure the landscape, move dirt, and create a level backyard. We put in a small lawn and gravel paths that defined the entire space at the back of our property. We also raised one area of the yard where the septic could drain in a different direction than the house if it rained like that again.
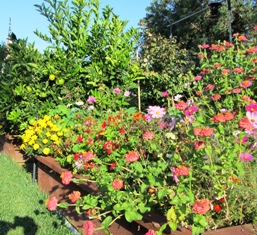
Planting boxes line the lawn
Carlos incorporated into the overall landscape design several planting boxes in which to grow our berries as well as flowers. The soil here is heavy clay that turns to concrete in the summer. Planting boxes allows us to control the soil, enriching it with nutrients and compost as needed. The gravel paths enable us to move around the acreage during the rainy season, inspecting the boxes of plants, without getting getting mired in mud. The cost to build each box is about $125.00.
Planting boxes allow us to meet each each plant’s needs, for example, acid-soil for blueberries, or great drainage for roses. I first observed raised beds in massive planting boxes during a trip to Russia in the late 1990s. In a centuries-old village along the Volga, I saw vegetables and herbs flourishing under an apple tree planted in the center of a massive box. Our Henny Penny Farmette planting boxes are 4 ft. by 6 ft., so we wouldn’t grow trees in the boxes. However, we have planted a citrus or fruit tree between the boxes. These raised beds in frames truly make it possible to grow almost anything and create a sense of order out of the wild chaos of nature.
Protecting Honeybee Hives

Honeybees swarming in the crotch of a pear tree
In early October, I helped my beekeeper neighbor medicate his honeybees as well as the bees in the hives he had given me. Our work will ensure the bees make it through the winter. Although some beekeepers do not believe much in the value of medicating bees to ensure the health of the colony, my neighbor (who learned beekeeping at the knee of his father) maintains a healthy colony of bees that are flourishing and producing large quantities of honey.
Healthy bees are necessary for pollination of our nation’s crops. For reasons not well understood, roughly one-third of all the U.S. honeybee colonies have disappeared since 2006 when beekeepers in America and Europe sounded the alarm that worker bees were not returning to their hives and disappearing at alarming rates. Initially beekeepers and scientists postulated that the honeybee problem could be traced to infection by mites, a fungus, a weakened immune system, contact with pesticides, and/or stress or combinations of several factors. More recently, studies are suggesting that the CCD problem possibly is related to the use of neonicotinoids, a new class of pesticides introduced in the 1990s.

A super of honeybees with ten frames
Chemically linked to nicotine, neonicotinoids are associated with diminishing bee populations in several new studies, although the Agriculture Research Service (ARS), the internal research agency of the U.S. Department of Agriculture, asserts that little is known about the causes of CCD. The ARS offers the following advice to beekeepers: “mitigation must be based on improving general honey bee health and habitat and countering known mortality factors by using best management practices. This includes supplemental feeding in times of nectar/pollen scarcity.” See, http://www.ars.usda.gov/News/docs.htm?docid=15572#bk
Commercial beekeepers feed their bees corn syrup and neonicotinoids have been used routinely on corn. Recently, Harvard Professor Chensheng Lu was quoted in a New Yorker article as stating he believes one reason for CCD is the “link between high-fructose corn syrup and use of neonicotinoids.”
So while my neighbor and I can medicate against pathogens and parasites, we will be watching to see what the EPA, the USDA, and other governmental agencies decide about the widespread use of pesticides and specifically the use of neonicotinoids.
Homegrown Strawberries
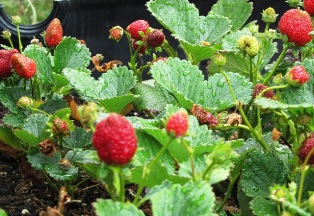
I used dry straw to mulch my strawberries today. In early October, I gave them a feeding and also added a layer of healthy organic compost that was dry. Strawberries are one of the easiest berries to grow. Give them the right nutrients, lots of sun, plenty of water (especially during growing season), and you’ll be rewarded with plenty of sweet, succulent berries. Rinse and eat them right after picking or dip them in melted chocolate, add a handful to a healthy shake, or drop them into homemade ice cream or a bowl of tart yogurt drizzled with honey–the possibilities are almost endless for enjoying these sweet eatables from the garden.
The soil for strawberries should be fairly rich. A good rule of thumb is to create soil that is 50 percent solid and 50 percent porous space. The latter provides room for plant roots, water, and air. I like to grow my berries in 4 x 6 foot raised beds rather than growing them in a traditional garden bed. The raised beds seem to minimize the problems with snails and slugs. Strawberries need sun and water. If salinity is a problem, plant them in a flat bed bed. They don’t do so well in the desert or places where water salinity poses a problem.
Strawberries are easy to start if you buy a dozen starter plants from your local nursery. Almost any planting container will do . . . an half wine barrel, a wooden crate filled lined with a plastic bag and filled with planting mix, or even an old bucket with some nail holes to permit drainage. Don’t bury the crown; it will rot. Topmost roots should be about a quarter inch below the soil surface.
Many varieties of strawberries reproduce with new plants at the end of runners. You can pinch off the runners or allow them to grow up to 7 to 10 inches apart. If you pinch the runners, you’ll get bigger berries but smaller yields; if you let them grow, you’ll get smaller berries but heavy yields. Check with your local nursery for more information about which strawberry varieties grow best in your area.
Fried Zucchini Flowers

The recent rain has brought out more blooms on the zucchini plants just when I thought the plant had finished producing. The beautiful yellow blossoms can be easily turned into a tasty treat when deep fried in hot oil and sprinkled with salt and your favorite dried herbs from the garden.
For optimal results, pick the large blossoms in the early morning after they have opened. You’ll need to remove the stalks and rinse the flowers, taking care not to damage them. Then let them drain while you prepare the crepe-like batter.
Ingredients:
24 zucchini blooms
1 c. all-purpose flour
pinch of salt
1 T. olive oil
1 egg (separate the yolk from the white)
approximately 2/3 cup of water
seasoning–salt and your favorite dried herbs
mild tasting oil such as canola for deep frying
Directions:
In a wok or heavy frying pan, heat the oil until hot but not smoking. Mix the ingredients to make the batter which should be pourable. Beat the egg white until stiff and fold it into the batter. Dip each flower to coat with batter and fry in the hot oil until golden. Sprinkle with herbs and salt and drain on paper towels.